✨ 기억보다 기록을/프로젝트
IceCraft - EmailJS 적용하기
서카츄
2024. 6. 30. 19:00
이전 포스팅
EmailJS 라이브러리를 활용하여 문의사항 받기
내 이메일 주소를 공개하지 않으면서 접속자로부터 메일을 받을 수 있는 기능을 추가하고 싶었다.우리가 게임을 진행하다가 차마 못잡은 버그 부분이나 유저가 느꼈을때 불편한 사이트라면 피
seokachu.tistory.com
이전 포스팅에서 EmailJS 라이브러리를 활용하여 문의사항을 받으려고 했었다.
이걸 직접 우리 IceCraft 프로젝트에 직접 적용해보자
Docs example만 그대로 따라해도 구현 가능해서 쉽게 구현 가능했음
전체 코드
"use client";

import React, { useRef, useState } from "react";
import S from "@/style/commons/commons.module.css";
import emailjs from "emailjs-com";
import { toast } from "react-toastify";

const InquiryPage = () => {
  const form = useRef<HTMLFormElement>(null);
  const [isSending, setIsSending] = useState(false);

  const sendEmail = (e: React.FormEvent<HTMLFormElement>) => {
    e.preventDefault();

    if (!isSending && form.current) {
      setIsSending(true);

      emailjs
        .sendForm(
          process.env.NEXT_PUBLIC_EMAIL_SERVICE_ID!,
          process.env.NEXT_PUBLIC_EMAIL_TEMPLATE_ID!,
          form.current,
          process.env.NEXT_PUBLIC_EMAIL_PUBLIC_KEY!
        )
        .then(
          (result) => {
            console.log(result);
            toast.success("문의가 성공적으로 전송되었습니다.");
            form.current?.reset();
          },
          (error) => {
            console.log(error.text);
            toast.error("이메일 전송이 실패되었습니다. 다시 시도해 주세요.");
          }
        )
        .finally(() => {
          setIsSending(false);
        });
    }
  };

  return (
    <section className={S.inquiryWrap}>
      <h2>문의사항</h2>
      <form ref={form} onSubmit={sendEmail} className={S.sendInner}>
        <div>
          <label>
            답변 받으실 이메일 <span>*</span>
          </label>
          <input type="email" name="user_email" placeholder="ex) abc@example.com" autoFocus required />
        </div>
        <div>
          <label>
            제목 <span>*</span>
          </label>
          <input type="text" name="title" placeholder="제목을 입력해주세요.(20자 이내)" maxLength={20} required />
        </div>
        <div>
          <label>
            내용 <span>*</span>
          </label>
          <textarea name="message" placeholder="내용을 입력해주세요." required />
        </div>
        <button type="submit" disabled={isSending}>
          보내기
        </button>
      </form>
    </section>
  );
};

export default InquiryPage;
코드 설명
  const form = useRef<HTMLFormElement>(null);
  const [isSending, setIsSending] = useState(false);
useRef를 사용해서 form 요소에 접근할 수 있게 form을 설정해준다.
useState를 이용해서 이메일 전송 중인지 나타내는 isSending State값을 생성한다.
setIsSending으로 상태변경이되면 초기화시켜준다.
isSending을 넣은 이유는 사용자가 보내기를 계속 광클했을때
계속 똑같은 내용을 계속 보내는걸 방지하기 위해 상태값을 추가하였다.
const sendEmail = (e: React.FormEvent<HTMLFormElement>) => {
  e.preventDefault();

  if (!isSending && form.current) {
    setIsSending(true);

    emailjs
      .sendForm(
        process.env.NEXT_PUBLIC_EMAIL_SERVICE_ID!,
        process.env.NEXT_PUBLIC_EMAIL_TEMPLATE_ID!,
        form.current,
        process.env.NEXT_PUBLIC_EMAIL_PUBLIC_KEY!
      )
      .then(
        (result) => {
          console.log(result);
          toast.success("문의가 성공적으로 전송되었습니다.");
          form.current?.reset();
        },
        (error) => {
          console.log(error.text);
          toast.error("이메일 전송이 실패되었습니다. 다시 시도해 주세요.");
        }
      )
      .finally(() => {
        setIsSending(false);
      });
  }
};
이메일 전송 함수 sendEmail
isSending이 false이고, form.current가 존재할 경우에 이메일을 전송한다
조건이 맞으면 setIsSending(true)를 호출해서 이메일 전송을 한다.
emailjs.sendForm 라이브러리를 사용하여 이메일을 전송한다.
전송이 완료되면 setIsSending(false)로 상태를 변경해준다.
     <button type="submit" disabled={isSending}>
        보내기
      </button>
disabled={isSending} 은 전송중일때 비활성화 되도록 설정해두었다.
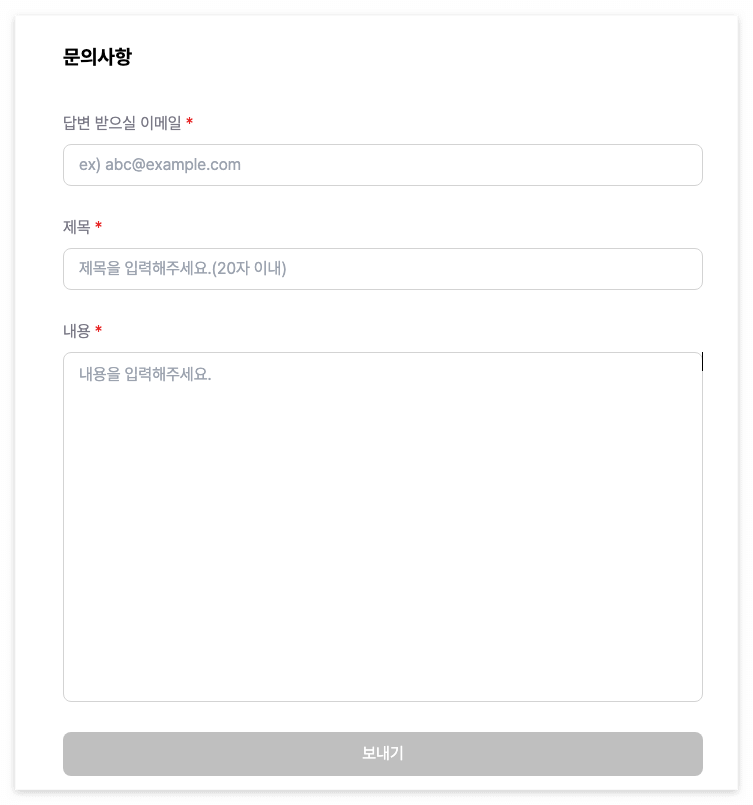
완성 결과